

Bedrooms & Storage
Wardrobe Internals: Plan the Inside Before You Pick the Shutters
Plan internals around the person, not the panel: roughly 60:40 hanging-to-shelf for shirt-and-trouser wearers, 40:60 for saree-first wardrobes, drawers between 400 and 1,200 mm reach height, a loft for the once-a-year layer, plus lighting and one good lock. Get this right and any shutter finish feels premium; get it wrong and no laminate can save it.
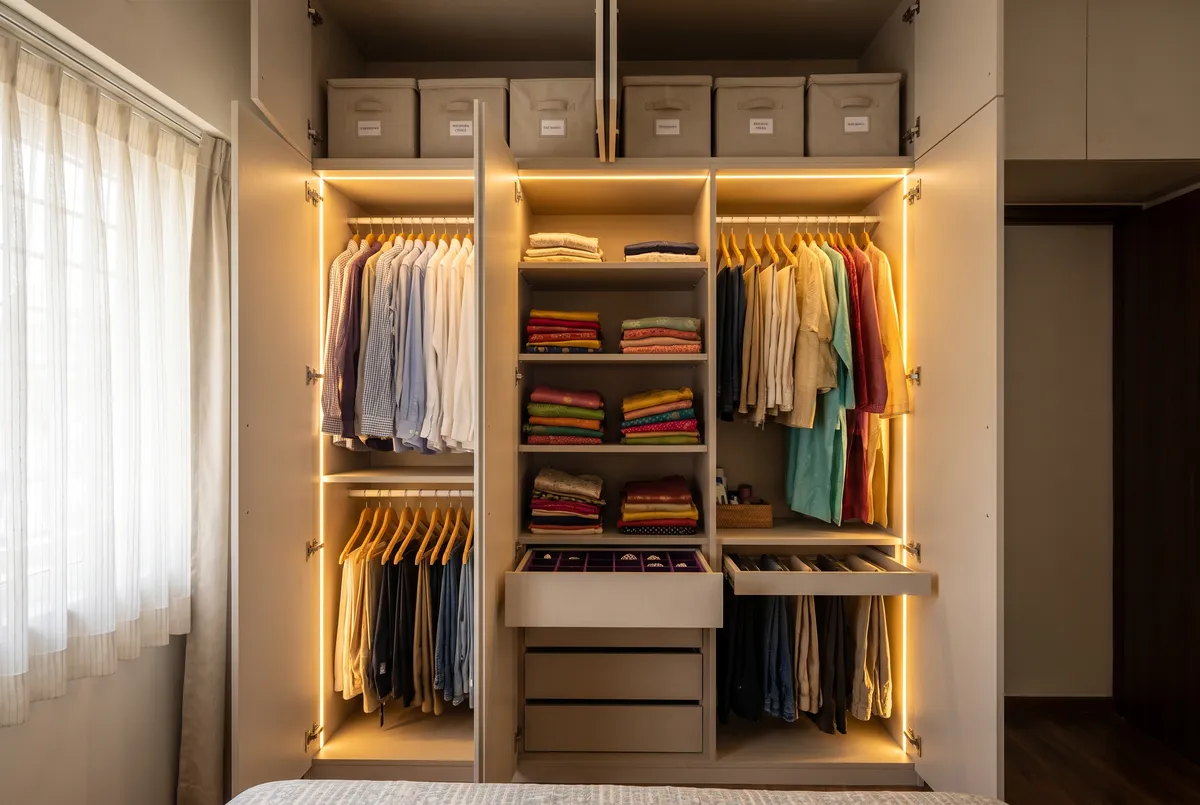
Why do wardrobe internals matter more than the shutter finish?
Quick answer
Internals decide daily usability: you look at the finish for seconds a day but reach into the layout thirty times a week. In Bengaluru, factory-built wardrobes typically run ₹800–2,200 per sq ft of shutter area excluding 18% GST, and most of that spread is finish.
The shutter is what guests see; the internals are what you live with. You look at the finish for a few seconds a day and reach into the layout thirty times a week, so the inside — not the laminate — decides whether the wardrobe still feels premium in month six.
The economics say the same thing. In Bengaluru, factory-built wardrobes typically run ₹800–2,200 per sq ft of shutter area, excluding 18% GST, and most of that spread is the finish you choose. Yet a top-of-range acrylic wardrobe with a generic two-rods-five-shelves layout will frustrate you daily, while a mid-range laminate wardrobe planned around your actual clothes will not.
The failure mode is predictable: internals copied from a standard drawing because nobody asked what you own. Good wardrobe internal design starts with an inventory — count your hanging clothes, folded stacks, sarees, trousers and jewellery before a single carcass line is drawn.
How much hanging vs shelving does each wardrobe user need?
Quick answer
Plan the split by person: roughly 60:40 hanging to shelving for shirt-and-trouser wearers, about 40:60 for saree-first wardrobes, closer to 20:80 for children. Full-length hanging needs 1,600–1,700 mm clear drop; half-hang needs only 950–1,000 mm, which lets two rods stack in a 2,100 mm carcass.
Start from the person, not the plywood. A shirt-and-trouser wearer needs roughly 60:40 hanging to shelving; a saree-first wardrobe flips to about 40:60, because most sarees live folded flat; a child's wardrobe is closer to 20:80, mostly shelves and drawers at heights they can actually reach. His-and-hers carcasses rarely need the same split, so plan each side separately.
The dimensions matter as much as the ratio. Full-length hanging — dresses, sherwanis, long kurtas — needs 1,600–1,700 mm of clear drop. Shirts and folded-over trousers on half-hang need only 950–1,000 mm, which is what lets you stack two rods inside a 2,100 mm carcass and double the capacity. Shelves work hardest at a 300–350 mm vertical pitch, with spans under 900 mm so 18 mm boards don't sag under saree stacks.
Insist on adjustable shelf rows — the 32 mm hole system — rather than fixed panels. Wardrobes outlive their first layout, and converting a shelf bay into a second hanging rod should be a screwdriver job, not carpentry.
Which wardrobe accessories in India are actually worth it?
Quick answer
Three accessories earn their keep in almost every Indian wardrobe: soft-close drawers at 150–200 mm internal height, mounted between 400 and 1,200 mm off the floor; a trouser pull-out holding eight to twelve pairs crease-free; and a velvet-lined jewellery tray with a lock.
Three accessories earn their keep in almost every Indian wardrobe: soft-close drawers, a trouser pull-out and a lockable jewellery tray. Drawers at 150–200 mm internal height, mounted between 400 and 1,200 mm off the floor, take innerwear, T-shirts and daily jewellery out of the shelf-rummage zone. A trouser pull-out keeps eight to twelve pairs crease-free in the width one folded stack would occupy. A velvet-lined jewellery tray with a lock retires the classic necklace-in-a-saree-fold system.
Be sceptical of the rest of the wardrobe accessories market in India: tie and belt organisers you'll touch twice a year, pull-down hanger lifts that only make sense above 2,000 mm, and perfume racks that steal usable shelf depth.
Your protection is an itemised quote. We price every pull-out and tray as its own BOQ line — our quotes hold 95% accuracy against final billing — so you can see exactly what each accessory costs and delete the ones your routine won't use.
What is the smartest loft strategy?
Quick answer
Treat the loft as annual storage — luggage, quilts, festival décor, the woollens box — not overflow, at 450–600 mm tall above the main carcass. Keep the same 580–600 mm depth so suitcases fit, ask for an 18 mm base with mid-supports, and give it separate shutters.
Treat the loft as annual storage, not overflow. A 450–600 mm tall loft above the main carcass is for luggage, quilts, festival décor and the woollens box — things you touch a few times a year. The moment daily items migrate above 1,800 mm, the wardrobe has failed, because anything that needs a stool stops getting used.
Detail it deliberately. Give the loft its own shutters so opening it never disturbs the main wardrobe line; keep the same 580–600 mm depth so suitcases actually fit; and ask for an 18 mm base with mid-supports, since loaded trolley bags will bow a thinner span. If ceiling height allows a floor-to-ceiling build, run the loft to the slab and eliminate the dust shelf on top entirely.
One honest budget note: the loft doesn't need your hero finish. Matching laminate on loft shutters, with the premium finish reserved for eye-level doors, reads identical from the bedroom doorway and trims real money from the quote.
Do sliding wardrobe internals need a different plan?
Quick answer
Yes — sliding wardrobes need zoning, because only one door-width is ever open, so each door should hide a self-sufficient daily kit. Drawers must sit centred within one door's clear opening, and sliders run to around 650 mm total depth against 580–600 mm for hinged wardrobes.
Yes — sliding wardrobe internals need zoning, because only one door-width is ever open at a time. Spread shirts across the full width of a three-door slider and every morning becomes a shuffle. Instead, plan each door's opening as a self-sufficient zone, with your complete daily kit — half-hang, drawers, two shelves — behind a single door.
Drawers are the classic sliding mistake. They must be centred within one door's clear opening, or the overlapping panel blocks them halfway out. Allow 70–100 mm of extra depth for the track assembly too, which is why sliders sit at around 650 mm total depth against 580–600 mm for hinged wardrobes.
Choose sliding for geometry, not fashion. It earns its place when the bed leaves less than 600 mm of shutter-swing clearance in front of the wardrobe. Below roughly 1,800 mm of wardrobe width, stay hinged — two narrow sliding doors give you slot-machine access to a wardrobe you will quietly curse.
How should you plan wardrobe lighting and locks?
Quick answer
Specify one sensor-driven LED strip per door-width — 12 V profiles in 3000–4000 K, recessed vertically along the side panels — and lock the container, not the wardrobe, using a lockable jewellery tray or one locked drawer. Wire the 5 A point before the carcass goes in.
Plan one sensor-driven LED strip per door-width and one lock where it counts. Wardrobe interiors are dark exactly when you use them — 6.30 am with the curtains drawn — so specify 12 V LED profiles in 3000–4000 K, triggered by a door sensor and recessed vertically along the side panels, so light washes every shelf rather than just the top one. The non-negotiable is wiring: a 5 A point above or beside the wardrobe must exist before the carcass goes in, so raise it during electrical work, not after installation.
For security, lock the container, not the wardrobe. A lockable jewellery tray or one locked drawer protects what matters while the family uses everything else freely; whole-shutter locks mostly guarantee a lost key.
All of this is decided before production, which is why we walk clients through the internal layout in the 3D design stage and freeze it there — handover then runs 30–45 days from that freeze, and the inside that gets built is exactly the one you approved.
Frequently asked
Get your real number
Share your floor plan — we turn these rates into a line-by-line proposal, usually within one working day.
Get an instant estimate